Omega - Tracking Order Document
Getting Started
After installing the app, the app interface will display the "Dashboard" tab.
You can have a quick view on different tabs to see all features inside the app
After reviewing all the features, there are some sections that you should notice:
- If you want to show and process your previous orders. Please use Get old orders function
 2. The app will generate a preview link of tracking page to add it in your store front:
https://ot-app-dev.myshopify.com/apps/order-tracking

To see how to add the tracking page to your store navigation menu, please check the instructions at How to add the tracking page to your store page
Dashboard
The Dashboard tab display the following information:
⭐️ Shipment quota usage: to check the rest of your quota in order to know whether you have to recharge for more.
Order and shipments info:

This section lets you know how many orders and shipments info during a certain period of time. You can select the date range from the list on the right side.
Total view count indicates the number of tracking page clicks on your store.
⭐️ Shipment status statistical chart: last 30 days

The chart displays the shipment performance of the last 30 days based on different tracking status.
Each color represents different tracking status, you can see clearly the number when you move to different days.
The app also have function for you to export the statistics, increase or decrease day to see data:

Shippment
This section provides detailed information of all orders for you:

You can export the data of shipment info by exporting an excel or csv file with these buttons:

To locate the order, you can enter the tracking number or order ID in the search bar. For example:

Otherwise, you can filter the order by time or by shipment status:

By time includes:
- Today
- Yesterday
- Last 7 days
- Last 30 days
- This month
By shipment status includes:
- Delivered: The shipment was delivered successfully
- In transit: Carrier accepted or picked up shipment from the shipper. Shipment is on the way
- Out of delivery: Carrier is about to deliver the shipment, or it is ready for pickup
- Info received: The carrier received a request from the shipper and is about to pick up the shipment
- Exception: Custom held, undelivered, returned shipment to the sender or any other shipping exceptions
- Fail attempt: Carrier attempted to deliver but failed, it usually leaves a notice and will try to deliver again
- Expired: Item on hold. Refused or unclaimed by recipient
- Pending: Verifying address; Processing error, Possible delay
- Courier not supported
⭐️ Reorder the shipments:
You can order the list to see the details by click the arrow next to the title of column:

⭐️ Shipment details:
If you click the order, you can see the details of the order in the app:

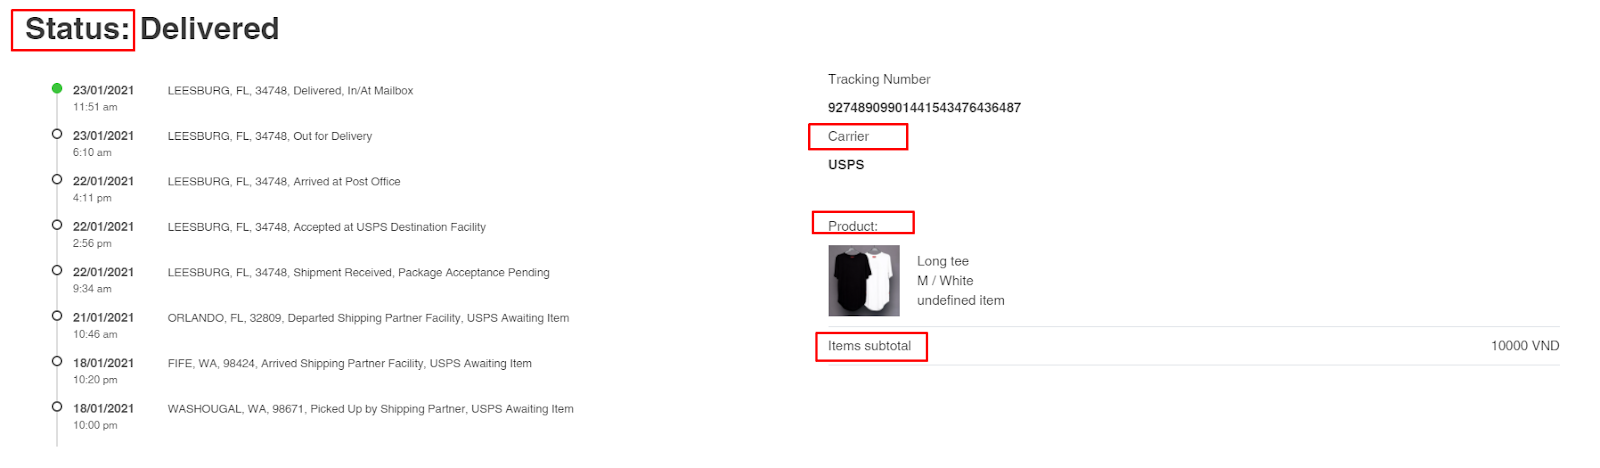
Or if you click the tracking number, you will be redirected to the tracking page and see the detailed tracking information as below:

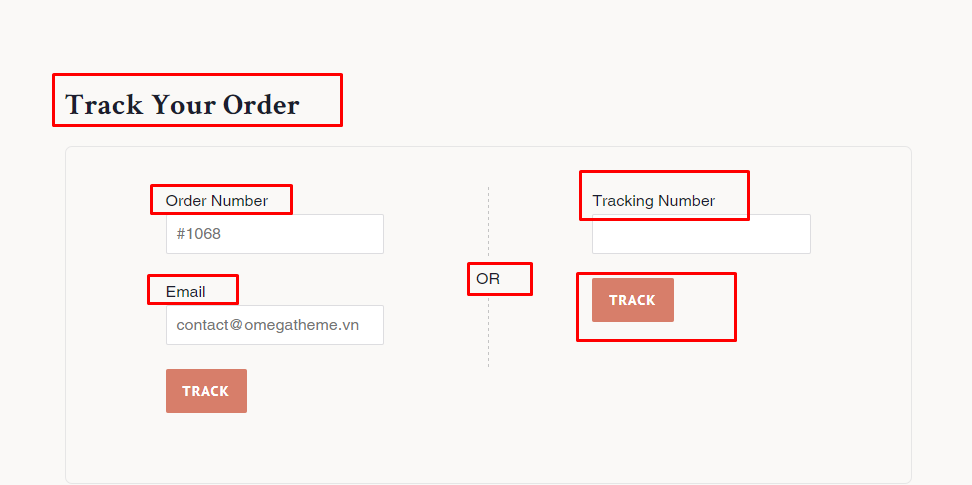
Tracking Page
You can customize the tracking page by using 4 sections in the Tracking Page tab:
⭐️ Display: Customize the display layout, color, contained content of tracking page
Setting:

Result:

Once you make changes and save, the display will change correspondingly.
⭐️ Date & time format: Customize time's display style on your tracking page
Setting:

Result:

⭐️ Translation strings: Display text on tracking page in your desire language
1. Form Tracking
When you change the words in the following section, it will change in your tracking page correspondingly:


2. Progress Bar


3. Result Page
Setting:

4. Additional Content
Customize your tracking page by adding custom content, using html and css markup fragments

Setting
Replace the tracking link of tracking number on order status page: enable this feature, instead of going to courier's website, your customers will check the order status right on your store.
Add a tracking link to order status page: enable this feature to add a tracking link to the order status page
How to add a tracking number to Shopify order?
Please follow the steps in the video below to add tracking number to your order on Shopify:
⭐️ How to add tracking page to Shopify store?
Please refer the video below to see how to add tracking page to your Shopify store
The tracking page on your store will look like this:
![]()
Step 1: Go to your Shopify admin → Online Store → Navigation
Step 2: Select Main menu section (recommended option) to add your tracking page to

Step 3: Click Add menu item, name your page and type the code: /apps/order-tracking and choose the link

Step 4: Save your change and you will see the tracking page appearing on your store.
Notifications
- Email Template Settings
- This is Email template Settings interface:


-
Admin Email Template: set up the email to receive when order status is changed. These variables { } are replaced with corresponding information from your store. Click Save button to save the changes that you’ve ma

⭐️ How to connect email account ?
To make email sending/ receiving function working, you need to configure the email.
Step 1: Choose your type of email account and fill in the information.
For example:

Email configuration
⭐️Gmail configuration
- Go to https://myaccount.google.com/lesssecureapps and sign in with your account.
- You will see the box like this screenshot, if not go to step 4

- Go to https://myaccount.google.com and sign in with your Gmail account
- Choose Security in left menu, make sure turn on 2-step Verification, then choose App passwords

- In "Select app" choose "Other (custom name)"
- Input your app's name, then click "Generate" button
- Then, a popup with your app's password, copy this password

- Back to our app's admin, go to "Email Template" tab, paste your app's password to Password field
Important note:
If you do not see "Turn on "Access to the app is less secure", or it show like below:

It means the administrator account has disabled this option on your account.
Please follow the following steps to allow this option:
-
Sign in to your Google Admin console.
Sign in using your administrator account (does not end in @gmail.com).
-
From the Admin console Home page, go to Security
Basic settings
- To apply the setting to everyone, leave the top organizational unit selected. Otherwise, select a child organizational unit or a configuration group.
- Select the setting for less secure apps:
-
Allow users to manage their access to less secure apps
Users can turn on or turn off access to less secure apps.
-
Allow users to manage their access to less secure apps
- Click Save.
Who is your administrator?
Your administrator is someone associated with your mail account, not Google.
Your administrator might be:
- The person who gave you your username
- Someone in your IT department or Help desk (at a company or school)
- The person who manages your email service or web site (in a small business or club)
How to Enable 2-step verification for G Suite for work
- Log into your G Suite Admin Console.
- From the dashboard, select Security.
- Next, click on Basic Settings.
- Scroll down to the Two-Step Verification setting and tick the checkbox to Allow users to turn on 2-step verification. This will enable the ability for the account user to utilize two-step authentication if they choose. If you want to make it mandatory for your users to use two-step verification when signing in, please choose Enable enforcement
- Click on the Save changes button that appears.
⭐️Zoho mail configuration
The users need to generate and use application specific password when accessing the email account via POP/ IMAP or Active Sync if Two Factor Authentication is enabled for the account.- Login to http://www.zoho.com/mail as user
- Click My Account link at the top to view Zoho Accounts
- From the left menu, select Security >> App passwords.
- Under the Application Specific Passwords, click on Generate New Password.
- Enter the application name associated with this specific password. The app name is just a reference name, for you to verify/ revoke in future.
- Select Generate to view the application specific password.
- The device-specific password will be displayed only once and will not be displayed again.
- Back to our app's admin, go to "Email Template" tab, paste your app's password to Password field.
⭐️Yahoo mail configuration
You'll need to generate and use an app password. An app password is a long, randomly generated code that gives a non-Yahoo app permission to access your Yahoo account. You’ll only need to provide this code once to sign in to your third-party email app.- Sign in and go to your Account security page
- Click Generate app password or Manage app passwords.
- Select your app from the drop down menu and click Generate.
- Follow the instructions below the password.
- Click Done.
- Go to "Email Template" tab, paste your app's password to Password field
⭐️Amazon SES mail configuration
Step 1: Create SMTP Credentials
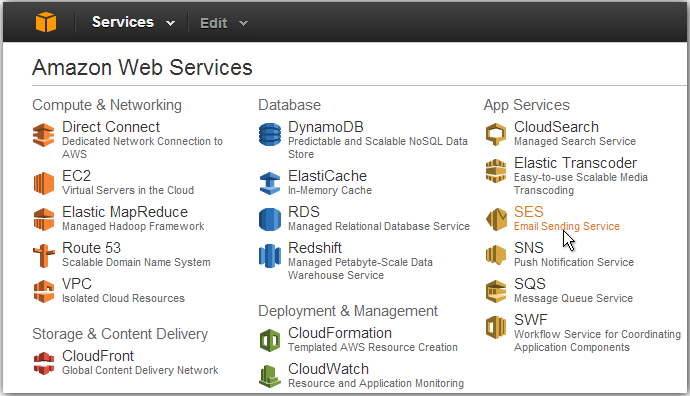
To send emails through the Amazon SES SMTP interface, begin by creating SMTP credentials - a user name and a password - as shown below:- Log into the AWS Management Console.
- Click the “SES Email Sending Service” option.
- In the left navigation bar, click the “SMTP Settings” option.
- Click the “Create My SMTP Credentials” button.
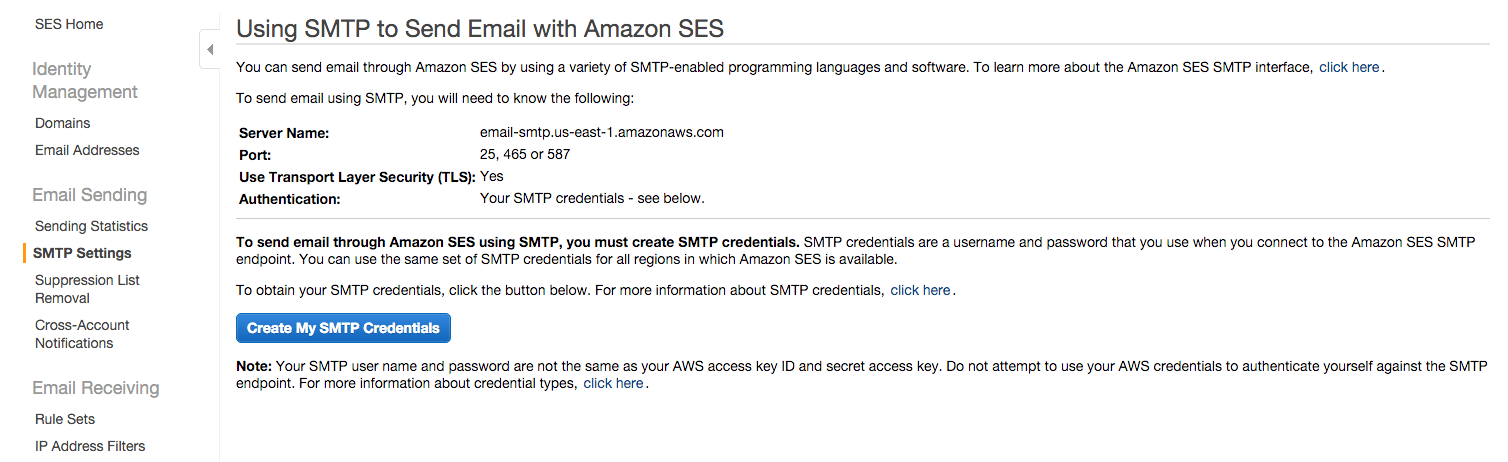
- Copy your credentials or click the “Download Credentials” button as the password will not be shown again.
- Log into the Amazon SES Console
- Click the “Verify a New Email Address” link.
- In the “Verify a New Email Address” dialog, enter the email address you wish to send messages from and click the “Verify This Email Address” button.
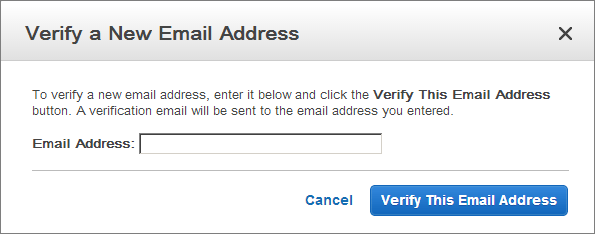
- You should now receive a verification message from Amazon SES asking you to confirm that you are the owner of the email address. Click the verification link in the message.
- Check the status of the email address in the Amazon SES Console. The status of the email address should change from “pending verification” to “verified”.
Input Username and password which the correct values from the credentials created in Step 1, while the EMAIL_ADDRESS placeholder should be replaced with any SES-verified email address to Email template tab.
⭐️Office365 mail configuration
To create a new app password for an app or device, take the following steps. You can repeat these steps to create an app password for as many apps or devices as you need.
-
Go to the Security basics page and sign in to your Microsoft account.
-
Select More security options.
-
Under App passwords, select Create a new app password. A new app password is generated and appears on your screen.
-
Enter this app password in the password bar inside the app settings.
⭐️ CUSTOMIZE EMAIL TEMPLATE
- You can turn emailing on and off for each order status by pressing the button Disable/Enable.
